All about the starting lights schedule, and how they use the screen buffer
Getting a good start can be crucial to winning a race, and there's no doubt that leaving your competitors in the dust is an art. Riding the clutch is an essential skill, and hitting the optimum rev count is vital, but it's not just about knowing your car. It also pays to know how the starting lights work, so you can be poised on the keyboard, ready to screech off the starting line the second the lights turn green.
Let's take a closer look at the timing of the starting lights, and how they are drawn on-screen.
The starting lights pattern
---------------------------
The starting lights are implemented by the ShowStartingLights routine, which is called from part 2 of MainDrivingLoop on every iteration of the main driving loop. If this is a practice or qualifying lap, or it's a race and we have already started, then the routine just returns control straight back to the main loop, but if this is a race that hasn't started yet, things swing into action to display the starting lights.
The lights shown at the start of each race follow the same pattern, which looks like this (the lights are in the top-right corner, just above the horizon):
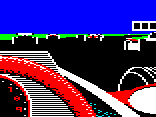 | The lights are shown but are initially off, so they appear as three lights with a white border and dark interior. |
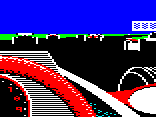 | Once we have started our engine, the timer starts and after a pause the lights turn blue. During this time we can't move, but we can rev the engine. |
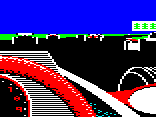 | After a nail-biting countdown, they finally turn green to start the race, and we can pull away. |
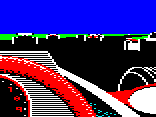 | And then after another pause, the lights disappear. |
This process is implemented using a counter in the raceStarting variable. It works like this.
- When a race is about to start, raceStarting is set to 128
- 128 = show black lights
- raceStarting stays on this value until the engine is started, at which point it jumps to 240 and starts to count down, with one tick per iteration of the main driving loop
- 240-192 = show black lights
- 191-161 = show blue lights, so we are under starter's orders
- At 160, keep showing the blue lights and stop counting down until the main loop counter is a multiple of 64
- At which point we set raceStarting to 40 and start counting down again
- 40-1 = show green lights, so the race has started
- 0 = stop showing the lights, as the race is fully underway
The raceStarting counter is also used to control the point at which we can slip the clutch while on the starting grid. See the deep dive on modelling the engine for details.
Drawing the starting lights
---------------------------
The three starting lights are drawn in a way that takes advantage of the way the screen buffer works. The screen buffer implements a fast filling process, which is described in detail in the deep dive on drawing the track view, but essentially, when drawing the screen buffer on the screen, non-zero bytes in the buffer are replicated to the right until we come across another non-zero value.
It's this process that fills in parts of the screen like the sky and grass, but with minimal drawing - you just need to poke a single fill byte into the buffer, and every byte to the right of it will automatically be filled with the same fill pattern, up to the first non-zero value (or the edge of the screen if there isn't one).
Most of the fills in the track view use a solid colour - the sky and grass verges are pure blue and pure green, so the fill bytes contain four pixels of blue or four pixels of green. The starting lights, however, use the screen buffer's fill process to replicate a fully patterned ten-by-four-pixel light, to give three identical lights, two of which are copies produced by the screen buffer.
The dash data blocks in the screen buffer go from 0 to 39, in columns from left to right across the screen, so to draw three starting lights, we only need to draw one light in dash data block 37. We draw the lights in the sky, so we know that the dash data blocks will contain zeroes, so the screen buffer's fast fill process will replicate our light into dash data blocks 38 and 39 for free - we don't need to draw them, as the screen buffer drawing routines simply fill everything to the right of the light in dash data block 37. This means the lights not only line up neatly, but they also change at exactly the same time.
Here's how it works. We draw in block 37, and the screen buffer replicates the same design into blocks 38 and 39, like this:
| 37 | 38 | 39 | Result |
 |
|
|
 |
 |
|
|
 |
 |
|
|
 |
Each light is designed to be four pixels wide - one pixel byte - with the first pixel in each line forming a vertical white line, and the other three containing the light pattern. In this way, replicating the lights three times will create the effect of having three lights, each separated by a white vertical line. Add in a white horizontal line at the top and bottom, and we end up with a row of three starting lights, and we only need to poke ten pixel bytes into one dash data block in the screen buffer to get all three.
It's a small touch, but a clever one.