Revs is literally sculpted in the shape of a Formula 3 racing car; here's why
One of my favourite retrocomputing easter eggs can be found in the circuit board for Computer Space, the world's first arcade video game. Created by Nolan Bushnell and Ted Dabney, Computer Space didn't exactly set the world on fire when it was released in 1971; that would have to wait for the following year, when the pair founded Atari and released the seminal and rather more successful Pong. But it was Computer Space that fired the starting pistol on the modern gaming industry, and its story is a fascinating and required read for anyone interested in gaming history.
My favourite part of the Computer Space story concerns the circuit board, and in particular the diode matrix that defines the spaceship sprites. These were the days before affordable ROMs, so when Bushnell designed this part of the game, he had to encode the sprite bitmaps directly into the hardware. The resulting diode layout shows the shape of the spaceship at various rotations: the circuit board literally looks like the game that it's implementing. You can see what I mean in the schematic for the memory board, though you may have to squint to see the spaceship's outlines in the mess of diodes; it's a bit clearer in photos of the board itself, which you can find in this article about fixing Computer Space, and in this one, and this one too. Prepare to waste a lot of time on these links (if you're like me, anyway).
But what does all this have to do with Revs? Well, it might not be hardware, but it turns out that Revs has a similar shape-themed easter egg buried within the code. The layout of the Computer Space circuit board is physically shaped like the spaceship that it implements, and it turns out that the codebase of Revs is physically shaped like a Formula 3 racing car. I'm not talking about bitmaps here, or driving models, or algorithms: I'm talking about the shape of the instructions - the sculpted layout of the game code itself. Revs, it turns out, is literally shaped like a racing car... and it even has an engine under the bonnet.
This might take some explaining, so bear with me as we pop the hood and take a deep dive into the heart of the Revs codebase.
Dash data
---------
To understand how Geoff Crammond forged the internals of Revs in the image of a racing car, you need to understand about the dash data, and how it unfolds itself from within the body of the game every time we visit the track. This process is explained in detail in the deep dive on the jigsaw puzzle binary, but to save you wading through this rather complicated read, here's a very quick summary.
Revs runs in two different screen modes. When we first load the game and choose things like wing settings and whether we are racing or driving practice laps, Revs runs in screen mode 7; when we move to the race track, the game switches into its custom screen mode, which is described in detail in the deep dive on the hidden secrets of the custom screen mode. As part of this switch, the game code moves chunks of itself into screen memory and above. These chunks fit together to form the dashboard image at the bottom of the screen, and they also slot together to form a large chunk of code that lives after the end of screen memory. The routines in this code block form the core of the game's graphics engine, and when we finish racing or return to the pits, the game moves all the dashboard and code fragments back into the main game code once again, and switches back to screen mode 7 to show the leaderboard and game menus.
This "dash data" (so-called because it contains both dashboard fragments and graphics engine data) is stored throughout the main game code in a structured but rather bizarre manner. Starting at address &3000, there are 40 blocks of dash data, one every 128 (&80) bytes (there are two further blocks, but they aren't relevant to this discussion). Each block is 79 (&4F) bytes long, and contains code or image data at the end of the block. Each block contains a different amount of data, with the fullest containing 77 bytes and the smallest just 36 bytes; any spare memory at the start of the block is used for storing other game code or data (in particular, a lot of this spare space is used to store the text tokens).
Finally, the amount of data stored within each block is defined in the dash data offset table; specifically, the dashDataOffset table contains the offset of the start of the data within each block.
So, to summarise, we have 40 blocks of dash data spread throughout the main game code at regular intervals, where each block contains a different amount of data, as defined by the offset for each block of dash data. When we go the track, the game takes all 40 blocks and assembles them in screen memory and above, to create the on-screen dashboard and the graphics engine, and when we leave the track, it splits the dashboard and engine back up into the 40 dash data blocks and inserts them back into the main game code.
Which begs the question: what on earth is all this jigsaw madness for? Well, our first clue is in the dashDataOffset table, which contains the offset of the start of the data within each block. If we plot the contents of the dashDataOffset table on a graph, showing the offset for each of the blocks 0 to 39, then it looks like this:

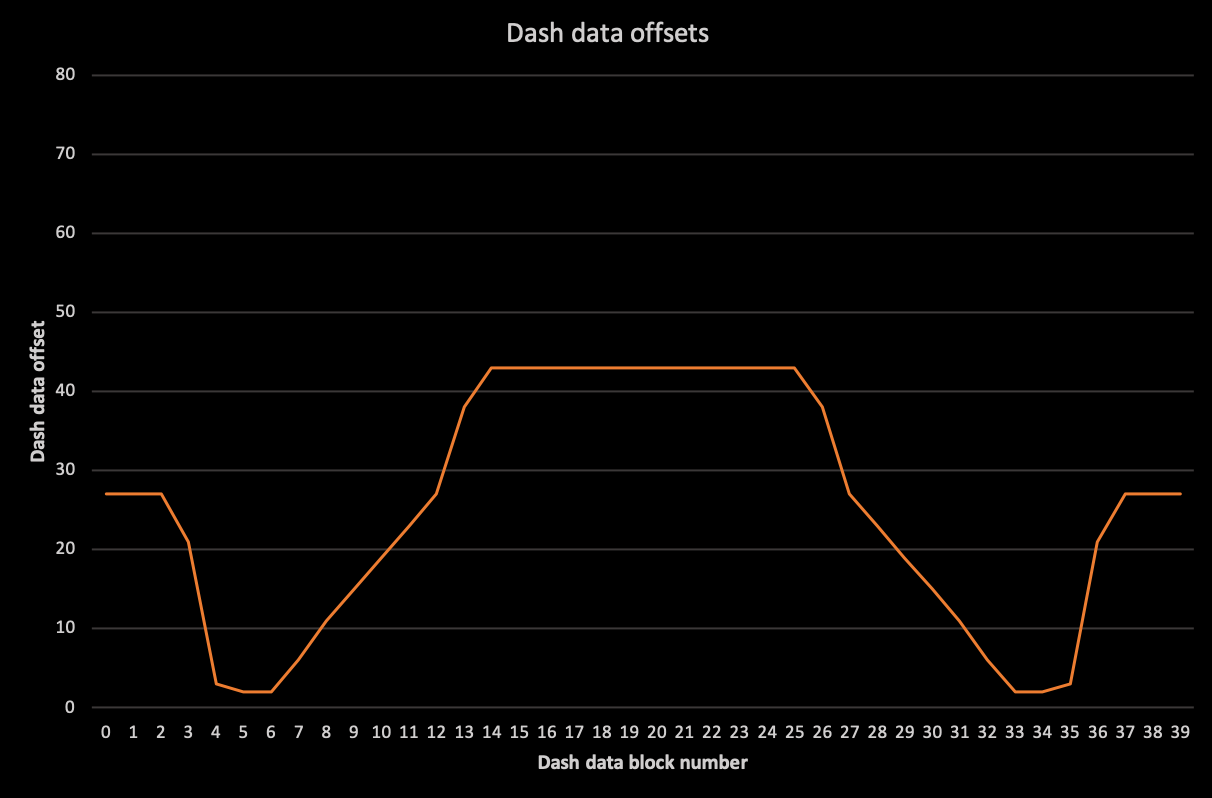

Huh, there's something familiar about this shape. It's symmetrical, it goes up in the middle and slopes down towards the sides, rising up again as it reaches the edges... ah! That's interesting. I wonder what would happen if...
...OK, got it! Here's the same shape, squashed vertically and with each data point replaced by a dot containing the block number, superimposed on the view we all know and love from the practice grid:
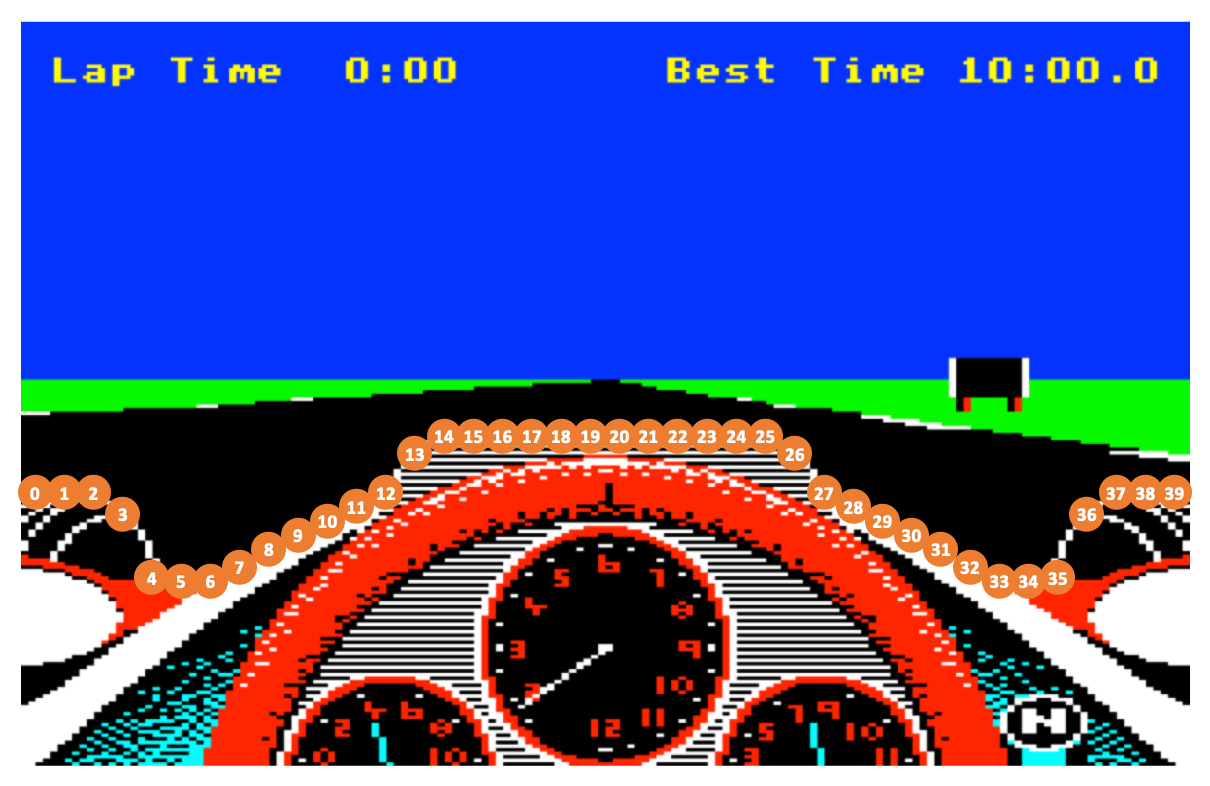
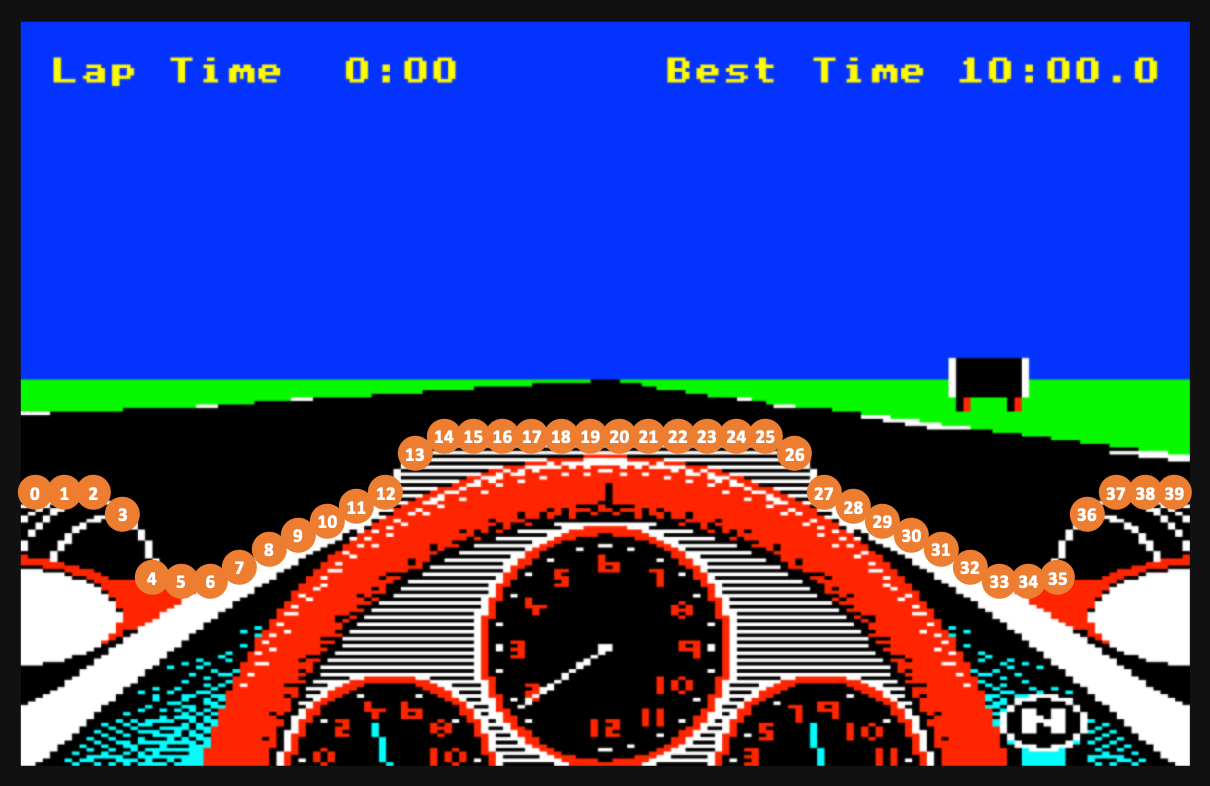

So the dash data is literally shaped like the dashboard of a Ralt RT3 Toyota Novamotor Formula 3 racing car? That's a pretty big clue, right?
It sure is. Let's see why.
Screen buffer
-------------
If we disassemble the graphics routines that get unrolled from the dash data, we can work out what's going on. When the dash data blocks are copied out of the main game code and reassembled in and above screen memory, they leave behind 40 blocks of memory that we can now use for something else - and it turns out that we use the dash data blocks as a screen buffer.
The details of how this screen buffer works are explained in the deep dive on drawing the track view, but at this point let's just consider the shape of this buffer. The dash data is organised in the shape of a Formula 3 car because the dash data blocks are used to store the track view, and the track view has to fit around the dashboard and tyres; in other words, the form of the screen buffer matches the function of the screen buffer.
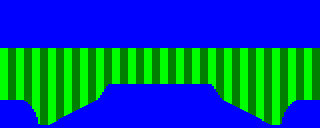
To see what I mean, take a look at how the dash data blocks are laid out in memory. We have a block of 79 (&4F) bytes every 128 (&80) bytes, with the data stored towards the end of that block. Let's lay out the entire block of memory from the start of the first block at &3000, all the way to the end of the last block and beyond. If we colour the data in each block in green, and colour the rest of memory in blue, with address &3000 in the bottom left corner and the address increasing as you go up and right, then we can see the structure of the dash data blocks:
| &307F &3050 &3000 |  | &43FF &43D0 &4380 |
To be more specific about what's in this image, let's look at the first column on the left, starting from the bottom left corner at address &3000. Each column is one byte wide, so by stepping up each column, we are moving through memory one byte at a time. Starting in the bottom left corner at &3000, where the first dash data block starts, we first have the text tokens token26 and token24, which form the blue section at the bottom of the first column, and then we have the data in the first dash data block at dashData0, which is the green strip in the middle of the first column. The dash data offset for the block is the distance between the bottom of the first column and the start of the green block. The green block of data takes us up to address &3050, at which point we have more blue in the form of the tyreEdgeIndex table and a few other variables that take us to the top of the first column at address &307F.
Continuing on, we start the second dash data block at the bottom of the second column, at address &3080, with the staDrawByteTyre table filling the blue bytes. This is followed by the green strip of dashData1, and then there's the ldaDrawByte table in blue above the dash data... and so on, stepping through all 40 of these 128-byte columns until we reach the start of the last dash data block at &4380, with dashData39 in the middle of the last column, after which we continue on with the rest of the codebase, from Print234DigitBCD at &43D0 onwards.
You can clearly see that the dash data is the same shape as the dashboard, and it's even more obvious when this data gets drawn on-screen to create the track view. If we actually drew each dash data block in green, rather than as a track, it would look like this:
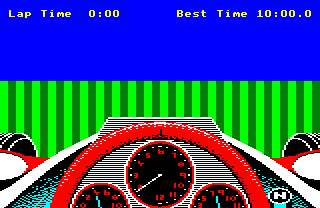
Each of these stripes gets its contents from the corresponding dash data block in the screen buffer. On each iteration of the main game loop, the game draws the track view into the 40 dash data blocks, populating the blocks with the track, cars, signposts, corner markers, horizon, grass and sky, and then the graphics engine takes that data from the dash data blocks and updates the screen by poking directly into screen memory (though note that we don't just copy data blindly from the screen buffer to the screen, as the screen buffer has a different data structure to screen memory). In this way the game can spend as long as it likes simulating the driving model and drawing the results into the screen buffer, but the amount of time spent updating the screen is kept to an absolute minimum, and this enables the graphics routines to produce a rock-steady, flicker-free display.
During this copying process from the screen buffer to the screen, the graphics engine carefully fits the track view around the edges of the dashboard and tyres, and because we do all the drawing in the dash data blocks, we don't need to clear the screen itself between each refresh. Instead we can clear the screen buffer once we've copied it to the screen, and can then draw the track view in the buffer, before simply copying the results over the top of the previous image in screen memory. That's why there is no flicker to be seen.
That said, there is no actual need for the screen buffer to be shaped like the dashboard; Geoff Crammond chose to organise it this way, in much the same way that Nolan Bushnell chose to design his diode matrix in the shape of a spaceship. The screen buffer could be implemented as one big block of memory, for all we care, as it's the process of copying from the buffer to the screen that implements the careful fitting of the display around the dashboard, rather than the shape of the buffer itself. But in Revs, as with all BBC Micro games, memory is scarce and every single byte is precious, and sculpting the dash data to fit the visible part of the track view saves as much memory as possible, while still providing a screen buffer that can hold the whole view in one go. As a consequence, the code that gets fitted in around the dash data ends up being in the shape of the dashboard, because that's one of the most efficient ways to store it.
So the shape of the car dictates the shape of the track view, which dictates the shape of the dash data, which dictates the shape of the code that fits around the dash data... and to add to the pleasing symmetry of this whole construct, the code that unfolds from within the dash data is the code that controls this entire process. What a thing of beauty!
To finish off, let's take a deeper look at how the data in the screen buffer makes it from the dash data blocks onto the screen.
Buffer to screen
----------------
The process of drawing into the screen buffer is covered in detail in the deep dive on drawing the track view, so let's assume the game has already drawn all the various cars, signs and tracks into the dash data blocks, and we are now ready to update the screen. This is done by the DrawTrackView routine, which is called once on each iteration of the main driving loop, as the last in a long sequence of subroutine calls in part 2 of MainDrivingLoop.
The DrawTrackView routine takes the data from each of the 40 dash data blocks, and draws the resulting track view on-screen, making sure to trim the edges carefully around the dashboard and tyres. In other words, it takes the screen buffer data from the dash data blocks, as discussed above:

and feathers the edges as it draws on-screen, like this:
resulting in a track view that fits perfectly around the dashboard and tyres.
The DrawTrackView routine draws this feathered track view one horizontal pixel line at a time, starting from the top line of the track view, and working down to the bottom track line. This is done in three stages, as follows:
| 1 |  | Track lines 79 to 44 |
| 2 |  | Track lines 43 to 28 |
| 3 |  | Track lines 27 to 3 |
The top line of the track view is track line 79, and the bottom line of the track view is track line 0, though we don't waste time drawing track lines 0 to 2, as they are always hidden by the dashboard. The biggest dash data block is therefore 77 bytes, which is one byte for each track line from 79 to 3 - see the deep dive on the jigsaw puzzle binary for details of the various dash data block sizes.
In the first stage, each line in the track view is the full width of the screen, so that's 160 pixels across. In the second stage, we have to omit a portion from the centre of the line to avoid drawing over the dashboard, so our track line is effectively split into two separate lines, one on either side of the dashboard. Finally, in the third stage, we not only have to avoid the dashboard in the middle, but the track lines also need to be truncated at the outer ends, to avoid drawing over the tyres and wing mirrors.
Just to make things interesting, Revs implements all three stages using the same routines for each one, but for the second and third stages it modifies the code to truncate each track line to fit around the dashboard and tyres. This makes the code a bit difficult to follow, especially as the various routines have been split up into separate parts that are linked by JMP instructions. This structure ensures that the relevant parts of the line-drawing routine start on page boundaries, which makes it easier to calculate the addresses that need to be modified to truncate the track lines. It does make it a bit trickier to follow, though, but let's take a look anyway.
Drawing in stages
-----------------
The first stage is relatively simple, and is implemented in part 1 of DrawTrackView, which draws this part of the track view:

There's a routine called DrawTrackLine that sets up the addresses of the screen and the screen buffer for the top track line, before falling through into the DrawTrackBytes routine to do the actual drawing. This draws all the individual bytes along the length of the one-pixel-high track line, according to the corresponding values in the screen buffer. One byte covers four pixels - that's one green column in the above image - so by the time all 40 bytes have been drawn, we have our 160-pixel-wide track line on-screen. We then update the screen and screen buffer addresses to point to the next line down, and loop back to the start of DrawTrackLine to draw consecutive lines until the first stage is done.
Things get more interesting in the second stage. This is implemented in part 2 of DrawTrackView, which draws this part of the track view:

To draw this shape we modify the code in DrawTrackLine and DrawTrackBytes so they draw two separate lines on each pixel row to avoid the dashboard in the middle. The structure of the DrawTrackBytes routine is designed to support this modification; you might expect a routine that prints 40 pixel bytes in a row to contain a loop, but instead that loop is unrolled into 40 consecutive instances of the byte-drawing code. Each instance is implemented using the DRAW_BYTE macro, which is explained in the deep dive on drawing the track view but for the purposes of this article, we just need to know that each instance of DRAW_BYTE takes one byte from the screen buffer and draws one pixel byte on-screen, resetting that byte in the screen buffer as it goes.
The modifications work in two ways. To stop drawing the left line before it runs into the central dashboard, we simply insert an RTS instruction after the DRAW_BYTE instance for the last full pixel byte that we want to draw. And to start drawing the second line at the correct place to the right of the dashboard, we just jump to the DRAW_BYTE instance for the first full pixel byte we want to draw, and run through the rest of the DRAW_BYTE instances to the end of the line.
On top of this, DrawTrackLine contains code to draw the pixel bytes where the track view meets the dashboard. The code works by taking the track view byte from the screen buffer, which is what we would show on-screen if the dashboard wasn't in the way, and replacing the pixels that are hidden by the dashboard with the relevant pixels from the dashboard edge. The leftDashMask and rightDashMask tables contain masks that we can AND with the track pixel to zero the pixels that are hidden by the dashboard, and the leftDashPixels and rightDashPixels tables contain the corresponding dashboard pixels, which we can insert into the pixel byte with an OR. These tables contain two mask/pixel pairs for each track line from 43 down to 0, so they define the feathering process for all the lines either side of the central dashboard.
The third stage is implemented in part 3 of DrawTrackView. It draws this part of the track view:

The code for this stage uses the same self-modification approach as part 2, but it's also applied to the outer ends of the track lines where they run into the tyres. For these lines, the leftTyreMask, leftTyrePixels, rightTyreMask and rightTyrePixels tables define the feathering process for the left and right tyres. They work in a similar way to the dashboard tables, though an extra bit of memory is saved by indexing the mask and pixel bytes via the tyreEdgeIndex table, which removes the need for four large tables that would otherwise contain quite a few duplicate values.
The final stage, in part 4 of DrawTrackView, resets the code back to how it was before our modifications, so that it's ready for the next screen update to start from the top again. This is a pretty quick process as the modification loops in parts 2 and 3 are designed to revert the previous track line's modifications as they go, so part 4 just has to tidy up the loose ends from the last iteration.
Like all self-modifying code, this drawing process is a bit of a mind-bender, but the upshot is a track view that fits around the dashboard and tyres in a pixel-perfect manner, and which is poked into screen memory as efficiently as possible, with absolutely no hint of flicker. And all this logic - this part of the game's graphics engine, if you like - is implemented in a block of code above screen memory that folds back up when it isn't needed, intricately slotting back into a data structure that's shaped just like the front part of a Formula 3 racing car. So, as the icing on the cake, it turns out that the car-shaped part of Revs contains a genuine engine under the bonnet.
It might not be quite as tactile as the diode sprites of Computer Space, but for me, Revs pushes all the same buttons.